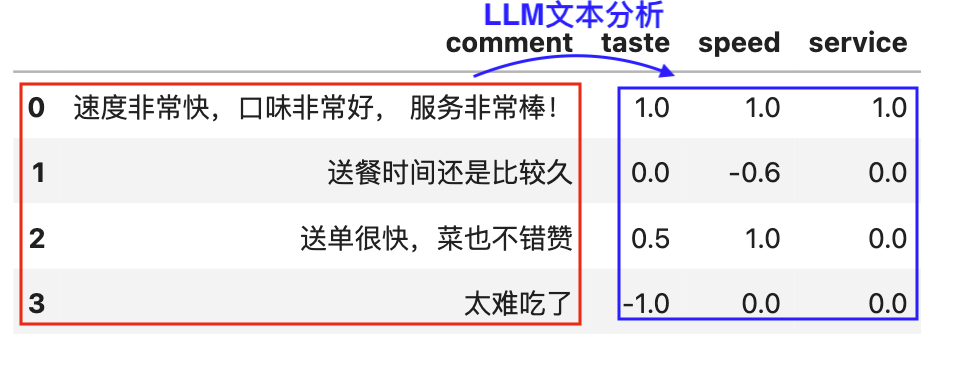
一、任务
之前分享 教程 | 使用大模型将文本编码为结构化数据(本地Ollma篇) 是基于Ollma的使用的大模型标注教程。 今天咱们换个新工具-LM Studio
使用 LM Studio 和 cntext 进行文本分析。
二、配置环境
2.1 安装cntext
cd desktop
pip install cntext --upgrade
2.2 安装LM Studio
在官网 LM Studio 点击下载, 该软件支持Win、Mac。

2.3 配置lms命令行工具
为方便调试,需要配置lms命令行工具。
- window打开cmd, 执行命令
/c %USERPROFILE%/.lmstudio/bin/lms.exe bootstrap - mac打开terminal, 执行命令
~/.lmstudio/bin/lms bootstrap
2.4 安装模型
模型可以选择点击操作安装,也可通过命令行安装。

打开LM Studio模型列表, 选择个小的模型进行安装。 可以找到 qwen3-4b。打开命令行cmd (Mac打开terminal), 执行安装命令
lms get qwen/qwen3-4b
Run
   🡇 To download: model qwen/qwen3-4b - 170.89 KB
   └─ 🡇 To download: Qwen3 4B 4BIT [MLX] - 2.28 GB

About to download 2.28 GB.
Continue? (Y/N): Y
⠦ [▏                     ] 0.00% |  707 B / 2.28 GB | 837.6777251184834 B/s | ETA 755:46:24        ⠦ [▏                     ] 0.00% |  707 B / 2.28 GB |                 0 B/s | ETA Infinity:NaN:NaN ⠦ [▏                     ] 0.00% |  707 B / 2.28 GB |                 0 B/s | ETA Infinity:NaN:NaN
⠇ [██████████████████████] 99.87% |   2.28 GB / 2.28 GB |             7.31 MB/s | ETA 00:00        ⠏ [██████████████████████] 99.87% |   2.28 GB / 2.28 GB |             7.31 MB/s | ETA 00:00        Finalizing download...
Download completed.
大概 10 分钟安装完成, 模型体积约 2.2GB。
当然了也可选择图形化安装,如图

2.5 查看已安装模型
查看电脑内已安装的模型,打开cmd(Mac打开terminal), 执行安装命令
lms ls
Run
You have 5 models, taking up 26.42 GB of disk space.

LLM               PARAMS    ARCH     SIZE
qwen/qwen3-4b               qwen3    2.28 GB
qwen3-1.7b-mlx              qwen3    984.01 MB
qwen3-32b-mlx               qwen3    18.45 GB
qwen3-8b-mlx                qwen3    4.62 GB      ✓ LOADED

EMBEDDING                               PARAMS    ARCH          SIZE
text-embedding-nomic-embed-text-v1.5              Nomic BERT    84.11 MB
图形化查看已经安装的模型

三、使用LM Studio
3.1 UI界面尝试


3.2 启动LM Studio服务
启动服务,方便Python调用LM Studio。 打开cmd(Mac打开terminal), 启动服务
lms server start
Run
Success! Server is now running on port 1234
注意: 后续如果想关闭服务, 执行命令 lms server stop
3.3 初次尝试
使用cntext内置的sentiment提示词模板,启用lmstudio服务,调用qwen/qwen3-4b模型。
%%time
import cntext as ct

texts = ["服务很棒!", "服务一般!", "服务很差!"]
for text in texts:
    score = ct.llm(text,
                   task="sentiment",
                   backend="lmstudio",
                   model_name="qwen/qwen3-4b")

    print(text, score)
Run
[cntext2x] ✅ 连接模型服务: http://localhost:1234/v1

服务很棒! {'label': 'pos', 'score': 0.9}
服务一般! {'label': 'neutral', 'score': 0.0}
服务很差! {'label': 'neg', 'score': -0.95}

CPU times: user 110 ms, sys: 8.3 ms, total: 119 ms
Wall time: 9.14 s
3.4 内置提示词模板
cntext2x 内置提示词模板不止支持sentiment,还有其他任务,如分类、实体识别等。具体如下
ct.llm.tasks_list()
Run
['sentiment',
 'emotion',
 'classify',
 'intent',
 'keywords',
 'entities',
 'summarize',
 'rewrite',
 'quality',
 'similarity']
查看模板内容
ct.llm.tasks_get('emotion')
Run
{'prompt': '识别文本中的主要情绪类型:从 [开心, 愤怒, 悲伤, 惊讶, 厌恶, 恐惧, 中性] 中选择最匹配的一项,返回情绪类型 emotion 和置信度 confidence(0~1)',
 'output_format': {'emotion': 'str', 'confidence': 'float'}}
3.5 自定义提示词模板
%%time
import cntext as ct
PROMPT = '从口味taste、速度speed、服务service三个维度, 对外卖评论内容进行文本分析, 分别返回不同维度的分值(分值范围-1.0 ~ 1.0)'
OUTPUT = {'taste': float, 'speed': float, 'service': float}

texts = ["服务很棒!", "服务一般!", "服务很差!"]
for text in texts:
    score = ct.llm(text="服务很棒",
           prompt=PROMPT ,
           output_format=OUTPUT,
           backend="lmstudio",
           model_name="qwen/qwen3-4b")
    score['text'] = text
    print(score)
Run
{'taste': 0.0, 'speed': 0.0, 'service': 1.0, 'text': '服务很棒!'}
{'taste': 0.0, 'speed': 0.0, 'service': 1.0, 'text': '服务一般!'}
{'taste': 0.0, 'speed': 0.0, 'service': 1.0, 'text': '服务很差!'}
CPU times: user 114 ms, sys: 8.12 ms, total: 122 ms
Wall time: 8.79 s
速度有点慢, 如果想加速, 可以考虑使用qwen3-1.7b模型(b的数字越小,模型运行速度越快,但是质量越差)。
cntext使用声明
如在研究或项目中使用 cntext ,请在文中介绍并附引用声明。引用格式可参考 cntext 推荐引用格式
相关内容
- PNAS | GPT 是多语言心理文本分析的有效工具
- 教程 | 如何使用 Ollama 下载 & 使用本地大语言模型
- 实验 | 使用本地大模型预测在线评论情感类别和分值
- 实验 | 如何使 Ollama 结构化输出 JSON 样式的结果
- 推荐 | 文本分析库 cntext2.x 使用手册
- 实验 | 使用本地大模型从文本中提取结构化信息
- 实验 | 使用 Ollama 本地大模型 DIY 制作单词书教案 PDF
- 实验 | 使用 Crewai 和 Ollama 构建智能体(AI Agent)帮我撰写博客文章

